

Cloud IO! Use as hardware
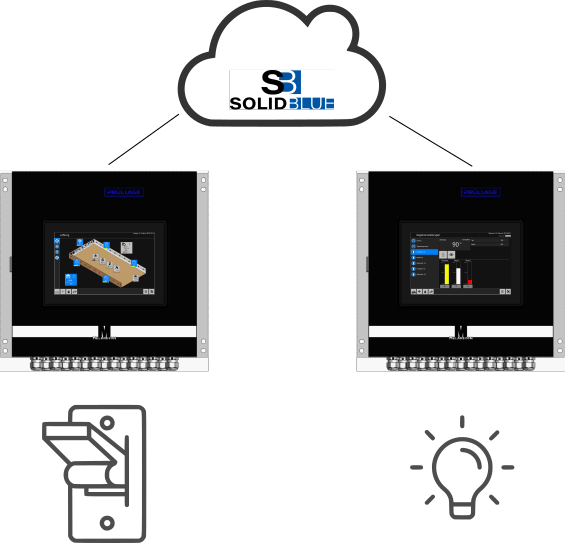
In this second part of the series “Cloud IO!” an example shows how Cloud IO can be used as physical hardware. While in the first part Cloud-IO! So what´s that? the general functionality was described and an example was shown of how process data can be displayed without programming, we now want to show other options. No programming knowledge is required here either.
Digital outputs
In the first part we created a subscription with the topic “Test/SwitchState” on the initial topic of the MELARECON. Now we want to use this to transmit the state of a digital input. In the installation menu of your MELARECON, switch to the “I/O configuration/Field devices/Cloud IO/Subscriptions” menu. Each subscription is automatically assigned a number. In our case, the topic “Test/SwitchState” received the number 10.
With this knowledge, we now switch to the “Digital outputs” dialog and select the first digital output from the list. Under the setting “Associated subscription nb.” we now enter the corresponding number of the topic (in this case 10). Further entries are now displayed:
- Enable monitoring: We ignore this setting here for now
- Maximum transmission cycle time: A change in the output state is generally sent immediately. However, in order not to put too much strain on the network when the state changes very quickly, a waiting time can be set here until the next state change is sent. We set 500ms here.
- Direct input assignment: Here you can assign a digital input. If you do this, the state of the digital input is adopted as the output state. As soon as there is a change at the digital input, this is transmitted to the broker. Here we select an input on which a button has been installed.
- Last received value: This shows you which value was last received on the subscription.
- Actual value: Indicates the state of the output as a digital signal.
- State of manual control level: If this output is linked to the hardware, it can also be overridden via manual control, as with all other digital outputs.
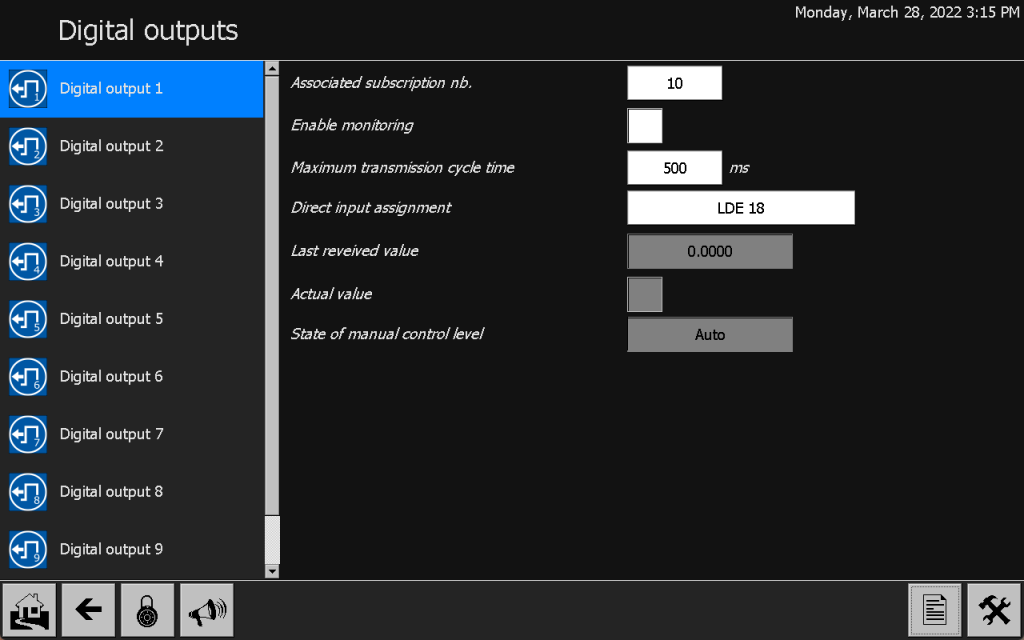
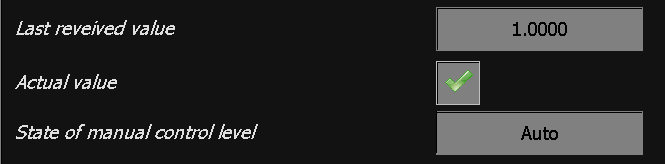
We can now test the settings made by simply pressing the button. We can easily see whether the function works in the settings that are displayed. If you press the button, a “1” is displayed for “Last received value” and a tick is set for “Actual value”. If you release the button again, “0” will be displayed again. This state is also displayed on the live tile created in the first part. The statue of the button is now correctly transferred to the set topic with the number 10.
Digital inputs
Now we use another MELARECON. This is also connected to the same customer account with SolidBlue. Here we also switch to “I/O configuration/Field devices/Cloud IO/Subscriptions” in the installation menu and create the same topic as on the device before. However, here we specify the full topic name and disable the “Use init topic” option. After you have created the new topic, the state of the button from the first device is immediately displayed. You can now test the function again by switching the button on and off. The values “0” and “1” should now also be displayed on the second MELARECON.
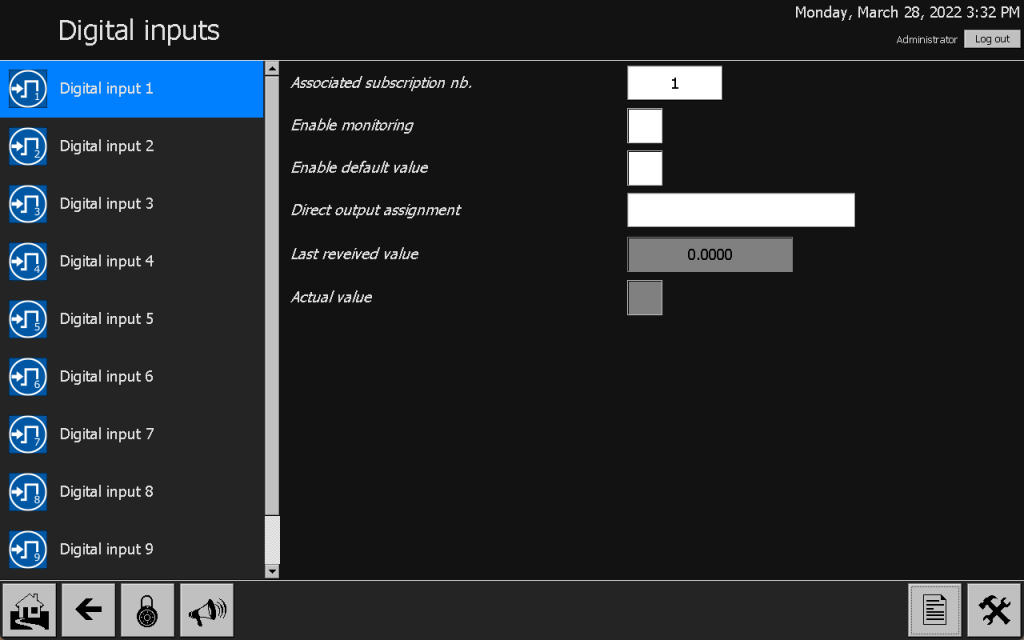
Remember the number of the new subscription again. We switch to the “Digital inputs” dialog and select the first input from the list. Under “Associated subscription nb.” we dial the associated number again (for me it’s 1). After the entry, new settings become visible again.
- Enable monitoring: We ignore this again.
- Enable default value: We also ignore this setting here for the time being.
- Direct output assignment: Here it is possible to assign a digital output directly. The received state is then written directly to the selected output. You are welcome to test this once. If you now press the button on your first device, you will find that the output is output directly. In our example we don’t use direct output.
- Last received value: The last received value is displayed here again.
- Actual value: Shows you the digital state of the input.
You were shown how to transmit a digital input to the SolidBlue broker and read it back and process it on another device.
Link to the hardware
But we are now going one step further. Switch to the Cloud IO “Hardware” dialog. Possible slots (similar to the I/O configuration) are displayed here. In our example we used digital input 1. We click on this in our hardware overview and add an IO card.

The result of this input is that there is now a new I/O card. This can be used in the next step in the existing program like any other digital input.
Use in software
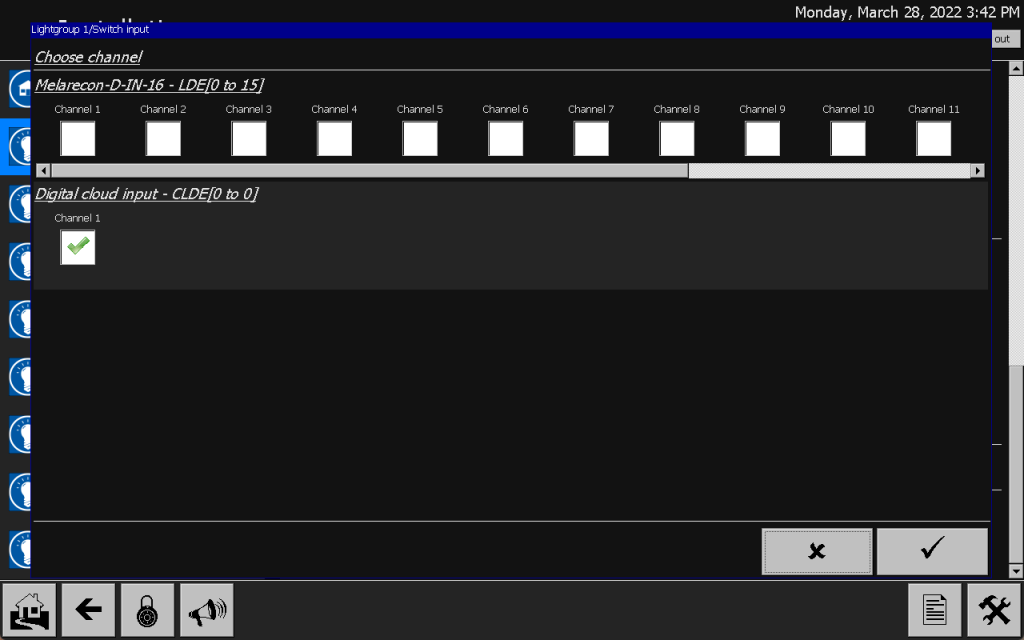
In our example, I use a MELARECON Lighting as the second device. Here I would now like to use the read-in button state for an existing lighting circuit. To do this, I switch to the settings for the corresponding lighting group in the installation menu. I would now like to assign the new digital input under the “Input button” setting.

Summary and outlook
If you now briefly press the button that is connected to your first MELARECON device, you will find that the corresponding light group activates the control light on second MELARECON. Location-independent, it is possible with Cloud IO to exchange a wide variety of signals and use them in the existing program without having to update the software. It should be emphasized again that the signaling device does not necessarily have to be a MELARECON device, but that this principle works across all manufacturers.
In a further article we will deal with the topic of security of Cloud IO. So feel free to check back here.
If you can’t wait, just get in touch with us.